|
January 23rd, 2013
Life hacks are little ways to make our lives easier. These low-budget tips and trick can help you organize and de-clutter space; prolong and preserve your products; or teach you something (e.g., tie a full Windsor) that you simply did not know before.
Most of these came from a great post on tumblr. There is also a great subreddit ‘r/lifehacks‘ with some fantastic tips as well.
1.

2.

3.

4.

5.

6.

7.

8.

9.

10.

11.

12.

13.

14.

15.

16.

17.

18.

19.

20. Separate egg yolks like a boss

21.

22.

23.

24.

25.

26.

27.

28.

29.

30.

31.

32.

33.

34.

35.

36.

37.

38.

39.

40. Ninja Fold

41.

42.

43.

44.

45.

46.

47.

48.

49.

50.

Sources
– muxedo task: 99 Life Hacks to make your life easier!
– r/lifehacks: http://www.reddit.com/r/lifehacks/
Category:
Educational Purpose| No Comments »
December 24th, 2012

Dear Clients, Friends, Business Associates
With Christmas come faith, hope, and love. I wish all these things for you and your family during the holiday season.
Merry Christmas and Happy New Year 2013
From your Electrician — Wurch Electric

Category:
Educational Purpose| No Comments »
December 5th, 2012
How to Seal Out Drafts and Seal in Comfort
Seal air leaks around your windows and doors to prevent wasting precious home heating and cooling energy that costs you money.
 Caulking and adding new weatherstripping can make old windows more efficient. Image: Somos Photography/Veer
An average home loses up to 30% of its heating and cooling energy through air leaks. The most significant air leaks tend to occur around windows and doors. To stop air leaks and prevent your home heating and cooling dollars from vanishing in the wind, it’s important to seal any air leaks around windows and doors.
Check for air leaks
With windows and doors closed, hold a lit stick of incense near window and door frames where drafts might sneak in. Watch for smoke movement. Note what sources need caulk, sealant, and weather-stripping.
Seal air leaks around windows
If you have old windows, caulking and adding new weatherstripping goes a long way toward tightening them up.
- Bronze weatherstripping ($12 for 17 feet) lasts for decades but is time-consuming to install.
- Self-stick plastic types are easy to put on but don’t last very long.
- Adhesive-backed EPDM rubber ($8 for 10 feet) is a good compromise, rated to last at least 10 years.
Nifty gadgets called pulley seals ($9 a pair) block air from streaming though the holes where cords disappear into the frames.
Seal air leaks around doors
Check for air leaks, and replace old door weatherstripping with new.
- Foam-type tape has an adhesive backing; it’s inexpensive and easy to install. If it comes loose, reinforce it with staples.
- Felt is either adhesive-backed or comes with flexible metal reinforcement. it must be tacked or glued into place. It’s cheap and easy to install, but it has low durability.
- Tubular rubber, vinyl, and silicone weatherstripping is relatively expensive and tricky to install, but it provides an excellent seal. Some types come with a flange designed to fit into pre-cut grooves in the jambs of newer doors; check your existing weatherstripping and replace with a similar style.
Check exterior trim for any gaps between the trim and your door frames, and the trim and your siding. Caulk gaps with an exterior latex caulk ($5 for a 10-ounce tube).
Seal door bottoms
If a draft comes in at the bottom, check the condition of the threshold gasket. Replace worn gaskets. If you can see daylight under the door, you may need to install a new threshold with a taller gasket ($25 for a 36-inch door). Or, install a weather-resistant door sweep designed for exterior doors ($9). Door sweeps attach directly to the door and are easy to install.
Information that is being provide is for Educational Purpose, Any electric work that is needing to be done, should be done by a Licensed Electrician.
Category:
Educational Purpose| No Comments »
December 5th, 2012
Power Smart Heating & Cooling Tips
Be Power Smart around your home to make it more comfortable and to save energy. Here are some small changes that you can make to improve the temperature of your home:
- Caulk and seal gaps to prevent air leakage:
- 30 to 50 per cent of air leakage gets in underneath the baseboards and through the wall outlets.
- 20 per cent of air leakage gets in through holes where plumbing pipes and telephone wires enter the house and other gaps.
- Turn down the heat in rooms you don’t use often.
- If your bedroom windows face north, keep your blinds shut when convenient during the cooler winter months.
- Plant a tree or shrub in front of your window on the sunny side of your home to provide shade in summer and act as a windbreak in chilly months.
- Install a setback thermostat and reduce your home temperature by 3 C for at least eight hours a day to save three to four per cent on heating costs. Program your thermostat to lower the heat while you’re sleeping or out, and to raise it before you wake up or get home.
- If you have a fireplace, you could be losing heat when air flows through the chimney. Talk to your chimney sweep for ways to reduce air flow when the fireplace is not in use.
- If you use air conditioning, keep your windows closed and shades or curtains tightly drawn on the sunny side of your house. In winter, save energy by opening your shades in the morning on the eastern and southern sides of your house, and closing them late in the day.
- Plant shrubs and trees around your house to shade your windows in summer and help protect your house from chilly winds in winter.
- Change your furnace filter frequently during winter and it will burn cleaner and uses less energy. Keep floor and wall registers clean to encourage airflow.
- Install full blinds or drapes to make your home more comfortable in summer. Open them in winter to use solar energy as an additional heat source.
Source: MB Hydro
Information that is being provide is for Educational Purpose, Any electric work that is needing to be done, should be done by a Licensed Electrician.
Category:
Educational Purpose| No Comments »
November 19th, 2012
Water Heaters 101
Your water heater is a pretty simple system, but that doesn’t mean it can’t develop problems down the line. Understanding how it works—and what to do when it doesn’t—can help you avoid serious hot water heater issues.
I Have a Water Heater?
Seriously, most people forget about their water heaters. Usually tucked away well out of traffic patterns in a storage closet, or in the corner of a garage, water heaters normally sit silently and do their jobs without a lot of fuss. But forgetting about them entirely can be a big mistake.
What’s the Worst That can Happen?
Unlike some systems in the home, when a water heater goes south on you, it doesn’t always just stop working. In certain circumstances, you can find yourself standing in 40 gallons or more of hot, scalding water. Worse yet, you risk explosions, fires, or the release of deadly carbon monoxide gas into your home. A cold shower’s looking pretty good about now, eh?
Don’t fret. This is just to impress upon you the importance of keeping an eye on your water heater. An annual inspection, coupled with some simple, regular maintenance, is usually all you need to worry about. But first, a little background.
Water Heater Basics
Water heaters are pretty simple on the face of it, and they’ve changed little in the past 50 years. Thanks to some key refinements, they are certainly better than they used to be, with longer life spans, higher efficiency, and more safety features that reduce the risk of injury and property damage.
All water heaters convert energy to heat, and then transfer that heat to water. They are connected to a cold water supply pipe and have at least one pipe for outgoing hot water that directs the heated water to taps and appliances throughout the house.
Though there is a variety of water heaters on the market, including electric, propane, tankless versions, and even solar-powered models, the most common in the United States is a holding tank fueled by natural gas.
These consist of a steel tank with a heating element at the bottom and a flue running down the center of the tank to vent the carbon monoxide that is a by-product of burning natural gas.
You’ll also see some sort of thermostat control on the body of the tank that allows you to shut off the gas and control the pilot light. These thermostats are equipped with a temperature-sensing probe that automatically shuts off the gas if they detect that the pilot light goes out or fails to light.
The interior of the tank is bonded with vitreous glass to protect it from rusting. Despite this protective sheath, there is always some small amount of steel exposed, caused by limitations in the coating process. That exposed steel is vulnerable to rust. To protect the steel from rusting, the manufacturers install sacrificial anode rods in the tanks, typically made of magnesium or aluminum. Through the process of electrolysis, the anode rod corrodes, instead of the tank. The tank will rust if the anode rod is completely consumed, unless you replace the anode rod. This is the most common cause of problems with water heaters.
Preventive Maintenance and Safety
For the purposes of this article, we’re going to assume that water heater was properly installed, and that it passed the home inspection.
Let’s talk preventive maintenance. Here are some basic steps to maintaining your water heater.
First, eyeball it.Water heaters have lots of rust protection inside, but very little on the outside, so watch out for leaks. Also check for staining, flaking paint, or corrosion on the surface of the tank. External rust can cause your tank to fail just as surely as internal rust. Remember that the exterior shell might look fine on the outside, while consumed with rust on the inside. However, if nothing looks out of the ordinary, move on to regular maintenance duties.
The two principle steps to maintaining your water heater are periodically draining the tank to remove sediment, and testing the temperature and pressure release valve (T&P) to ensure that it is working properly.
As your water heater operates, sediment forms. That sediment is actually calcium carbonate, a mineral present in the water, which is precipitated out through heating. It settles to the bottom of your tank, and can shorten the life of your water heater; reduce its efficiency; clog valves, lines and the recirculating pump; and even provide a haven for anaerobic bacteria. How often you drain your tank depends a lot on the water quality where you live. Areas that have very hard water require more frequent draining to keep sediment levels low. The frequency is anywhere from 6 months to 1 year.
The T&P valve is critical for preventing explosions due to overpressure, as it automatically releases water at certain critical pressure levels and prevents the tank from exploding. Test this valve periodically to ensure that it opens and closes properly, so it won’t fail when you need it most.
NOTE: If you’ve never performed these tasks before, it’s a good idea to hire a technician to do it for you the first time, and ask them to show you how to do it yourself. While it’s not excessively complicated, there are potential hazards involved. The risks of doing it incorrectly are great in comparison to a minimal service fee. When you see what’s involved, you may feel confident that you are capable of doing it yourself; otherwise, let the pros do it.
Finally, install a carbon monoxide alarm close to your water heater. Carbon monoxide is odorless and colorless, but if your water heater does not vent properly or begins to back draft, those deadly fumes can enter your house and endanger your family.
If everything is working properly, check the water temperature with a cooking thermometer to make sure it’s set to your families’ comfort level and to ensure safety. If the water is too hot, it can scald or cause injury. Conversely, some people set their water temperature low to try to be economical. If the water isn’t hot enough, it can harbor bacteria. A good intermediate setting for your water is 130 degrees.
Tanks for the Memories
Nothing lasts forever. Your water heater is rated by its estimated life span, which is typically anywhere from 6 to 12 years. With faithful maintenance, you can beat those numbers, help ensure your family’s safety, and save money in the process.
Source: Living With My House
Information that is being provide is for Educational Purpose, Any electric work that is needing to be done, should be done by a Licensed Electrician.
Category:
Educational Purpose| No Comments »
November 1st, 2012
Prepare Your Home For Winter

It’s official now – summer is over, Fall is in full swing and sadly, Winter days are drawing nearer and nearer. Aside from the much awaited Holiday season (and decorating); it is time now to prepare your house for the cold days ahead. The change of weather can create certain problems for your house that, with a little preparation, you can avoid and be free to enjoy the holiday season without worrying about your home.
Here are some tips on how you can get your house ready for colder days to come:
- Check your heater and replace filters if possible. You will need to use your heater more often hence it will be important to have it working properly. You can either go the do-it-yourself route or seek out a professional heater cleaning service but you should definitely replace all of your filters. If you have a fireplace, clean the chimney/floo and stock enough logs to hold out in between ice and snow storms.
- Equip your house with emergency essentials like flashlights, water, blankets, first aid kits and some blankets. Make sure you have extra batteries for your flashlight. This will keep you secured if power outages occur during a winter storm.
- Check your windows and doors for air leaks. This will prevent heat from escaping through these leaks as well as preventing as much cold air from coming inside. Make sure to cover these leaks either with either a plastic sealing kit, caulking, or some other kind of winterizing method. This will also help to save you a LOT of money on your heating bill.
- If you have outside furniture, cover them up so they can be protected from inclement weather. If they can be stored, store them in your shed or in your basement until spring.
- Protect your pipes in the house by insulating them. Pipes are vulnerable to freezing and can easily get damaged. Let the warm air circulate around them by opening your sink cabinet doors from time to time during the winter. For pipes in the attic, try insulating them.

- Check you snow blowers and shovels so you can use them during heavy snow to get out of your house/driveway. If you can’t find yours – replace them. Trust me, a very good investment.
- Trim the branches of your trees that may be touching your house so it will not contribute to damages from snow storms or winter ice when the limbs get heavy and fall.
- When installing Holiday lights inside and outside of your house, keep safety in mind. Ensure that the wires are good and properly connected before turning them on.
Source : Heather & Alan Davis
Information that is being provide is for Educational Purpose, Any electric work that is needing to be done, should be done by a Licensed Electrician.
Category:
Educational Purpose| No Comments »
October 30th, 2012
Easy Ways to Save Money When Hiring an Electrician For Your Project
Home improvement projects large and small involve electrical work. Moving light fixtures, rewiring for audio/visual equipment and installing appliances require working with the electrical system in your home. Although many of the smaller things can be handled by homeowners with only a little knowledge, the more involved work should be left to a trained electrician.
You might assume that electricians are expensive and consider DIY the only route to save money. But if your handiwork presents a fire hazard, blows fuses and disrupts the systems your family has come to count on, the cost of DIY electrical work can sky rocket. Calling in the pros is the best idea.
So how can you save money when hiring an electrician for those common home improvement projects?
 Compare Hourly Charges Compare Hourly Charges
An electrician often charges by the hour. When comparing the services of a few reputable, recommended electricians be sure to ask what their hourly rate is. This will allow you to compare them side by side.
Even if they are willing to quote you on the full project, ask them to break that down into labor and material charges.
Choose a Local Electrician
Since they do bill by the hour electricians will often charge you for travel time. Choose one located nearby to cut back on unnecessary costs. If you live in a rural location this may not be possible, but take the idea into account and factor travel costs into your comparisons.
Make the Most of Their Time
An emergency call to the electrician will carry a premium price tag. If you can wait until their schedule permits (not on the weekends and outside of office hours, for example), the cost will generally fall. But to save even more money you should try and schedule your electrical projects together.
What that means is having your electrician complete more than one project while he is at your house. This cuts down on travel time and should reduce the cost significantly when compared to having each job done individually.
When one project comes up it helps to have a walk around your home and make a note of any other electrical issues that could be looked at. Consider future needs as well as current ones and find out how much it would cost to add wiring for appliances and electrical equipment you plan to have later on.
Jot down any questions that you have and any electrical issues or situations that you feel may be dangerous. Have the electrician perform a quick inspection to answer your questions or allay your fears while he is at the house performing other work.
Remember To Pay For Quality
Electricians are highly trained to handle potentially dangerous situations and to create a safe, efficient electrical system in your home. This isn’t a job you want to leave to an inexperienced contractor just because he has the lowest hourly rate. Having an expert electrician come back to your home and repair an amateur’s work will cost you much more. Opt for the best electrician who is the most qualified for the job. Look for a fair hourly rate, but don’t skimp on quality for the sake of cost.
You can save money when hiring an electrician by making a few comparisons including hourly rate and proximity to your home. Try to group together all of the electrical projects in your home and have the contractor look after them during the same visit. Opt for the electrician with the right qualifications instead of just hiring the cheapest and paying more to have mistakes fixed. Simple steps will help you make it through these essential home improvements with more money in your pocket.
Source: Handy Canadian
Information that is being provide is for Educational Purpose, Any electric work that is needing to be done, should be done by a Licensed Electrician.
Category:
Educational Purpose| No Comments »
October 26th, 2012
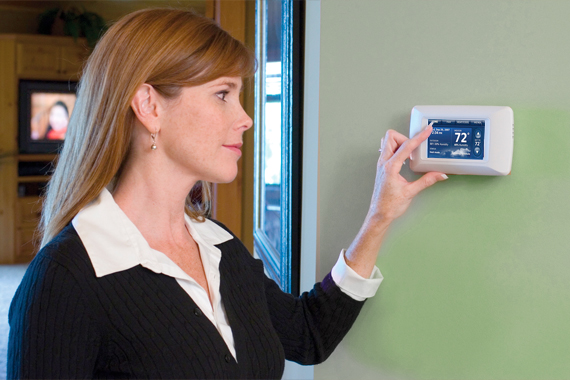
No Sweat: Programmable Thermostats Reduce Your Energy Costs
Advanced programmable thermostats give you precise control over your heating and cooling, helping to reduce wasted energy.
It’s no secret that heating and cooling account for the bulk of a home’s energy usage — an average of over $1,000 annually. Switching from a manual to a programmable thermostat is one simple way to save as much as $180 a year.
The most basic programmable thermostat can be self-installed in an hour, and comes with preset temperature settings for different times of the day.
Some of the latest models offer greater control, easy programming, sophisticated displays, and even communication with you via the Internet. Here is a look at some of these smart units.
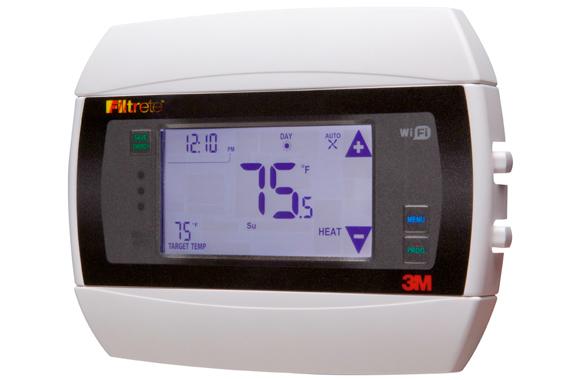
High-def, high-tech settings
You wouldn’t think of spending much time in front of your thermostat, but the newest advanced models—with their colorful touchscreen displays—are an engaging, interactive experience. They offer separate programs for each day of the week, and can even alert you if service is required.
With its high-definition screen display, Honeywell’s Prestige Comfort System resembles a mini-computer more than a traditional thermostat.
In addition to indoor temperature, the Prestige’s graphical user interface can display outdoor conditions and humidity with an add-on sensor. An onscreen wizard interviews you about your usage based on simple questions, and then sets a program accordingly. A portable controller lets you adjust settings from any room in the house.
The Prestige is priced from $250 and up.
If you can live without a fancy display, an advanced programmable thermostat from HAI costs around $300 to $400, while a simpler seven-day programmable model from Hunter costs $99.
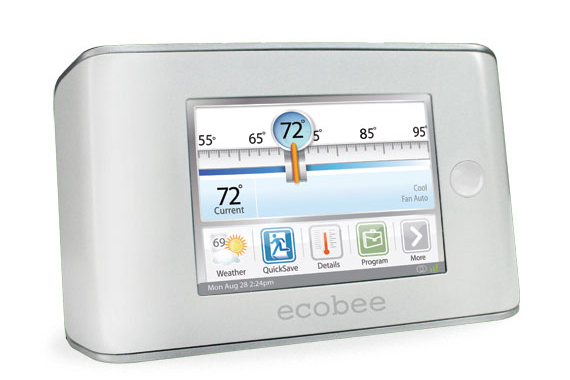
Control from afar
What if you’re on your way to a long vacation, and you suddenly realized you’d forgotten to turn down your home’s thermostat?
If your home is equipped with the Smart Thermostat from ecobee, you can tap into the system through a personalized web portal anywhere there’s Internet access. Log in to check on your HVAC’s performance and make adjustments on the fly. The unit sells for $469.
Manage your home’s HVAC via a home automation app from Control 4. The sophisticated system allows you to change thermostat settings from your smartphone, pad, and PC. In addition, you can control the lighting, music, window treatment motors, and a wide range of Control 4 devices.
Know the price before you turn it on
Pilot programs for installing smart thermostats that display “time of use” pricing information are underway in regions like Florida and California. These thermostats receive a wireless signal from the utility company, and adjust the temperature according to the price of electricity during different times of the day.
With costs for air conditioning at about 70 cents to $1.20 per hour, reducing AC usage only an hour per day would yield a savings of $65 to $110 over the course of a summer.
Check with your utility company to find out if such a program is available in your area.
Information that is being provide is for Educational Purpose, Any electric work that is needing to be done, should be done by a Licensed Electrician.
Category:
Educational Purpose| No Comments »
October 26th, 2012
Inside an Electrical Outlet
A cracked, loose, or (ouch!) shocking electrical receptacle is a candidate for replacement.
By Joshua Anusewicz, This Old House magazine
Information that is being provide is for Educational Purpose, Any electric work that is needing to be done, should be done by a Licensed Electrician.
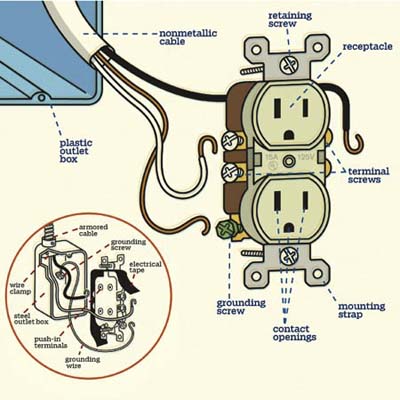 A cracked, loose, or (ouch!) shocking electrical receptacle is a candidate for replacement. But before you head out shopping for a new one, know what to ask for and how to connect everything safely. A cracked, loose, or (ouch!) shocking electrical receptacle is a candidate for replacement. But before you head out shopping for a new one, know what to ask for and how to connect everything safely.
Warning: Before you do any repairs on a receptacle, turn off the power at the breaker box.
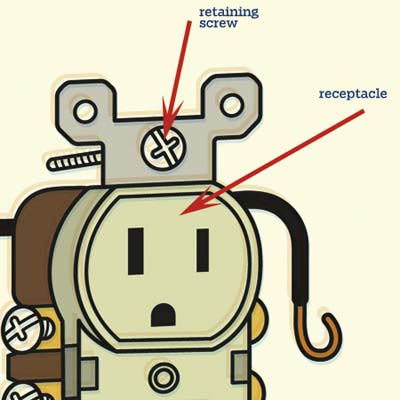
Receptacle. Replace if any part of face is broken or it doesn’t grip plug’s prongs firmly. Make sure amp rating embossed on face of receptacle doesn’t exceed amp rating printed on cable.
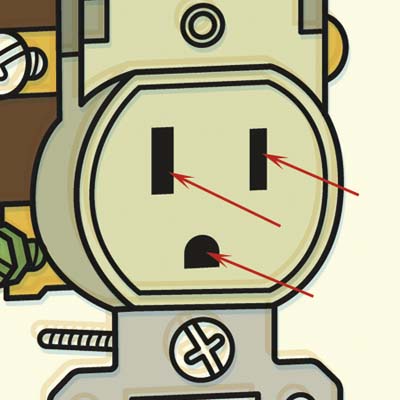
Contact Openings. Different shapes ensure appropriate plug prongs are matched to hot, neutral, and grounding wires.
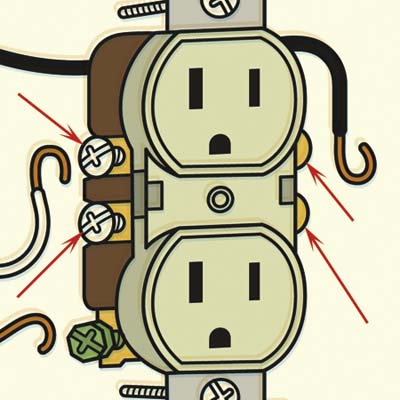
Terminal Screws. Safest points of wire connection. (Push-in terminals, or “backstabbers,” on back of receptacle are not as secure.) White wire always goes to one silver screw (it doesn’t matter which one), and black wire to one brass. Swapped wires or loose screws will cause shorts or shocks.
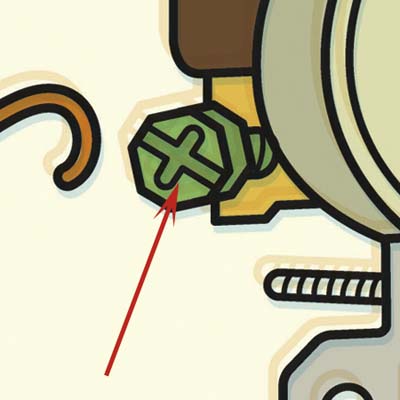
Grounding Screw. Connects to bare grounding wire to help prevent electric shocks.

Mounting Strap. Holds receptacle flush with outside of box.
Nonmetallic Cable. Also known by trade name Romex. Plastic jacket contains black (hot), white (neutral), and bare copper (grounding) wires that connect to circuit-breaker panel.
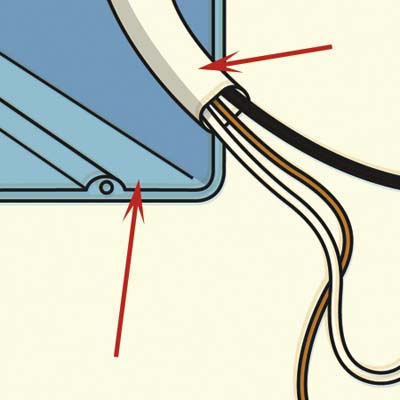
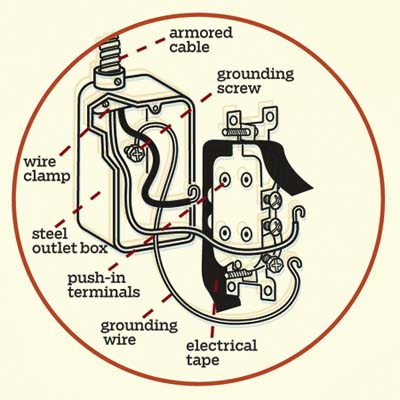 Steel Outlet Boxes and Armored Cable. In older homes and some cities, steel outlet boxes and armored cable are the rule. In this case, the receptacle is grounded to the box, which in turn is grounded by the cable’s metal sheath. Wrapping electrical tape over the terminal screws prevents them from touching the box and short-circuiting. Steel Outlet Boxes and Armored Cable. In older homes and some cities, steel outlet boxes and armored cable are the rule. In this case, the receptacle is grounded to the box, which in turn is grounded by the cable’s metal sheath. Wrapping electrical tape over the terminal screws prevents them from touching the box and short-circuiting.
Source: This Old House
Information that is being provide is for Educational Purpose, Any electric work that is needing to be done, should be done by a Licensed Electrician.
Category:
Educational Purpose| No Comments »
October 23rd, 2012
Burned Out on CFLs? We Address the Real Issues and Solutions
By: Karin Beuerlein
If you’re having trouble with CFLs, you’re not alone by a long shot. We chatted with an expert about the issues, how you can use CFLs successfully, and your alternatives.
 If you turn a CFL on and off a lot, that may contribute to its shortened life. Image: Plumen/Tom Mannion, photographer
If there’s one topic that has people talking, it’s CFL lighting. Here are just a few of the comments HouseLogic has received about CFL longevity or the lack thereof:
“… I find myself having to by [sic] those CFLs which cost more and only last three or four months. Additionally, they don’t create much light, which, given the quality of the light, is probably not all bad.”
“It is incredibly frustrating to read myths about how long-lasting CFLs are. They simply are not. I’m lucky to get more than three or four months out of one. You might think it’s great to have them for the energy savings, but at least tell the truth about their complete lack of durability.”
“… We live in the mountains, and our electricity goes on and off frequently due to high winds and damage to the power lines. This apparently decreases the life of CFLs … In my case, a CFL [lasts] no longer than a regular bulb, and the cost is at least 10 times more than a regular bulb.”
Based on your comments and some of my own puzzling issues with CFLs, HouseLogic asked me to explore why the bulbs haven’t lived up to many of our expectations — now that federal requirements for lightbulb efficiency have begun to phase in.
Our bathroom CFLs just kept blowing out
When my husband and I moved into our new home four years ago, we decided to replace all our incandescent bulbs with CFLs to be green and save on energy. We had a decidedly mixed experience with the quality and color of light — and the shades of meaning apparently implied by the label claim “instant on.” (Some CFLs take time to hit full light strength.) For instance, our hallway lights warmed up so slowly we went back to regular bulbs.
But the most frustrating location for CFLs was in our two bathrooms, where they hung upside-down in wall-mounted bell-shaped enclosures over each sink. A couple of bulbs actually blew out in a single day. Others lasted weeks; others months — but not the touted 10,000 hours by a long shot.
We checked the wiring and the fixtures but found nothing wrong. Our electrician sold us expensive, “high-quality” CFLs he liked (we weren’t familiar with the brand); the light was cold and unpleasant, but the bulbs did last 11 whole months. Then, within a span of two days, they all blinked out one by one, like chorus girls bowing at the end of a show.
CFLs can cost between $1.25 to $10 per bulb.
5 factors that shorten CFL lifespan
I consulted Russ Leslie, associate director of the Lighting Research Center in Troy, N.Y., who has tested bulbs for Energy Star. “If you just blow a single CFL bulb by itself, you probably just have a bad bulb,” Leslie says. “But when a CFL repeatedly burns out in the same fixture, there’s an issue.”
Leslie says several things can shorten a CFL’s lifespan considerably:
1. Rapid switching. This, I believe, is my problem — and also that of the reader who lives in the mountains. Apparently, projected CFL lifespans are based on a three-hour run time per start. In other words, during CFL testing, bulbs are cycled on for three hours and off for 20 minutes until half the samples have failed. If you turn them on frequently for less than three hours at a time — as I do in my bathroom — you’re in for a surprise.
“Incandescents are somewhat immune to the number of times you switch them on and off,” Leslie says, “but the electrodes inside a CFL are stressed with each burst of starting voltage, and will eventually degrade and fail. With a CFL, the number of starts is the primary factor for determining how long it will last; the number of burning hours is secondary. A CFL rated at 10,000 hours in the three-hour-on standard test might last only 4,000 hours if left on for only 15 minutes per start.”
OK, 500 for me, but who’s counting?
That’s why you shouldn’t use CFLs in motion-sensor lighting, by the way.
2. Heat and humidity. Heat and humidity can also reduce CFL life, and my bathroom has both. Although the glass bells of my fixtures are open at the bottom, heat still builds up inside each one. “CFLs like things cool,” Leslie says.
3. Dimmable or recessed lighting. Not applicable to my situation, but Leslie says that you must buy CFLs explicitly designed for those purposes (it’ll say so on the package).
4. Vibration. LRC hasn’t tested for this attribute, but the FAQs at GE’s website say that CFLs in fixtures that vibrate — such as ceiling fans and garage door openers — won’t perform well.
5. Variation in quality among manufacturers. “Consumer Reports” testing shows significant performance difference from brand to brand and for different applications (particularly for rapid switching, where a number of spiral-type bulbs received middling or poor ratings).
I also asked whether it mattered that the bulb was inverted (screwed into the fixture with the base up). Leslie said that LRC tested that attribute and found no significant difference in bulb performance.
“Overall, an Energy Star-rated CFL should perform well for you,” Leslie says, “if you choose an application it’s suited for. The technology has improved greatly in recent years, especially after Energy Star started verifying its performance standards.
“But if you aren’t having luck with a CFL in a certain fixture,” he says, “consider using a halogen incandescent on a timer or upgrading to LED lighting, which is rapidly improving.”
What about you? Have your CFLs lasted as advertised? How do you use them strategically? Or are you stocking up on incandescent?
Information that is being provide is for Educational Purpose, Any electric work that is needing to be done, should be done by a Licensed Electrician.
Category:
Educational Purpose| No Comments »
|
| |
|
|