 |
February 20th, 2018
You have purchased your home and upgrading your light fixtures
You notice that your home has Aluminum Wiring
Aluminum is still considered safe, unless and until homeowners change lights or plugs and use the wrong fixtures.
Hire a Qualified Electrical Contractor experienced in repairing aluminum wiring to do a thorough inspection of the electrical system,
even if the insurance company does not request one.
Wurch Electric has worked with many Insurance Company on Aluminum Wiring
Making sure that everything is safe
Contact Wurch Electric if you have any symptoms of this including receptacle discoloration,
flickering lights, the smell of hot plastic insulation and sometimes an electrical-induced static noise on the radio and/or television.

Follow the link to E-mail Wurch Electric
Information that is being provide is for Educational Purpose, Any electric work that is needing to be done, should be done by a Licensed Electrician.
Tags: Aluminium wiring posing a problem, DIY, don wurch electric, Electrical, Electrical repairs, electrician, HomeReno, HomeRepair, upgrades to your home, wurch electric.
Category:
Educational Purpose| No Comments »
March 20th, 2017

Here is some important electrical safety information from the Technical Standards and Safety Authority.
Electrical systems are designed to carry electricity safely throughout our homes. Overloading an electrical circuit by plugging in too many electrical items draws more electricity through the system than it was designed to carry. This can create overheating and result in fire.
Avoid overloading:
- If fuses frequently blow or circuits frequently trip, this is a sign the system is overloaded.
- Always use the correctly rated fuse. For example, don’t use a 30 amp fuse to replace an existing 15 amp fuse.
- Using multi-outlet extension cords can lead to plugging too many items into a single circuit.
- Avoid overloading circuits. Fuses that frequently blow or circuit breakers that trip can be a sign of overloading on the circuit.
- When replacing outlets contact a licensed electrical contractor if you are uncertain of the load rating for your home’s wiring.
Damaged or deteriorated wires can present shock or fire hazard and are signs you should be concerned with your home’s electrical system.
Avoid potential hazards by:
- Watching for dim or flickering lights, which can be a sign of a loose connection in a lighting circuit, fixture, or your electrical service.
- Check for overheated plugs or outlets which can indicate overloading or possibly faulty electrical wiring or equipment.
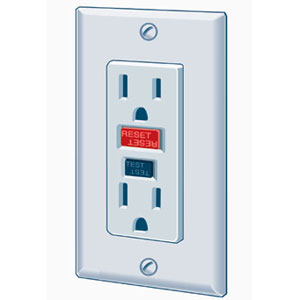
- Remember, if you have Ground Fault Circuit Interrupter outlets they should be tested monthly, as per manufacturer’s instructions, to ensure they are operating properly.
Thanks to the TSSA for this information.
Source : DaveCorner.ca
Information that is being provide is for Educational Purpose, Any electric work that is needing to be done, should be done by a Licensed Electrician.
Tags: circuits frequently trip, don wurch, don wurch electric, Don Wurch Electrician, electrical circuit, electrical items draws more electricity, fire hazard, fuses frequently blow, Ground Fault Circuit Interrupter, licensed electrical contractor, use the correctly rated fuse, wurch electric.
Category:
Educational Purpose| No Comments »
January 19th, 2017
(NC) As we encounter cooler days our attention inevitably focuses indoors. “Turning up the heat can be hard on the pocket book, but there are simple ways to reduce your heating bills,” says Alan Stewart, broker-manager with Royal LePage Sussex in North Vancouver. Stewart recommends these three cost-saving tips:
1. Replace or clean furnace filters once per month. Dirty filters restrict airflow and increase energy use. Keeping your furnace clean, lubricated and properly adjusted can save up to five per cent of heating costs.
2. Remove window screens. For the most part, homeowners keep their windows closed during the cold winter months to seal in warm air. Screens can block up to 20 per cent of the sun’s warm rays. Remove your screens and take advantage of nature’s heat.
3. Run your ceiling fans in reverse. Doing so, at a moderate speed, will recycle any warm air sitting near your ceilings and push it back down into your living areas. Turning your fan in a clockwise direction during the winter can help you recycle up to 10 per cent of your home’s heat.
Heating comprises about 60 per cent of a home’s energy bills during winter. More information on home maintenance can be found at www.royallepage.ca.
Source: www.newscanada.com
Information that is being provide is for Educational Purpose, Any electric work that is needing to be done, should be done by a Licensed Electrician.
Tags: Dirty filters restrict airflow, Keeping your furnace clean, Keeping your furnace lubricated, Remove window screens, Replace or clean furnace filters
Category:
Educational Purpose| No Comments »
December 10th, 2015
A house electrical service upgrade can be messy and expensive, but the cost to upgrade electrical service is necessary to protect the value of your home.
Not having enough power isn’t just an inconvenience — voltage drop-offs may actually damage sensitive electronics, so having plenty power is important to electrical home safety. Even with enough power, you may need additional outlets to avoid relying on a tangle of power strips and extension cords — a potential safety hazard.
The cost of upgrading electrical service
The standard for household power used to be 60 amps. But modern homes may need as many as 200 amps to run air conditioners, computer equipment, high-definition televisions, and high-tech home automation devices.
The cost of upgrading your existing electrical service panel to a 100- or 200-amp panel is $800 to $3,000.
New wiring: open your walls (and your wallet)
To handle increased electrical loads, it’s likely you’ll also need to upgrade electrical wiring, especially if your house is more than 40 years old.
Upgrading your electrical wiring is a big job because the wires are located inside of walls, where they are difficult to get at without opening up walls. The price for a whole-house rewiring job—including opening up walls, running new wires, connecting switches, outlets and fixtures, and then repairing the mess—is $3,500 to $8,000 for an average-sized home.
For a larger home, or a house with restricted access to a crawlspace and exterior walls, the cost may reach $20,000 and more for labor and materials.
Rewire when the time is right and save
Rewiring can be a messy and expensive proposition, but with a little upfront planning you can minimize the disruptions and even turn the job into an opportunity to add features that will increase the value of your home.
The best time to rewire is during a remodeling project, such as renovating your kitchen or adding a family room, when subcontractors are opening up your walls anyway. That way, your electrician has easy access to the walls, and refinishing walls will be part of the larger remodeling project—not just the rewiring.
Plan ahead for your future power needs
Structured wiring is a smart investment and may be a marketing advantage if you should decide to sell your home. Structured wiring is a generic term for any heavy-duty electrical and data cables designed to handle the latest entertainment and communication devices—and those yet to be invented—including phones, Internet, and household heating and lighting systems.
One way to estimate the cost of structured wiring is to determine the square footage of your house. Multiply that figure by $2.
While a standard electrical upgrade essentially maintains the value of your home, adding structured wiring can increase it. According to a 2009 study by the Consumer Electronics Association and the National Association of Home Builders Research Center, almost 50% of homes built in 2008 included structured wiring, a sure sign of its growing value to home owners.
Information that is being provide is for Educational Purpose, Any electric work that is needing to be done, should be done by a Licensed Electrician.
Tags: don wurch, don wurch electric, Don Wurch Electrician, New wiring: (and your wallet), New wiring: open your walls, Plan ahead for your future power needs, Rewire when the time is right and save, The cost of upgrading electrical service, wurch electric.
Category:
Educational Purpose| No Comments »
November 24th, 2015

(NC) Fall and winter can be tough on your home and your wallet. As temperatures drop, chances are that your furnace will be working overtime. This results in two unwanted things: greater energy consumption and higher heating bills. In fact, the costs associated with heating and cooling a home year-round can account for as much as two-thirds of the average annual energy bill.
Try these easy DIY projects to help cut down on energy loss and expenses:
1. Replace weather-stripping around doors and windows. Worn weather-stripping can create drafts and let heated air out, stressing your furnace and compromising your comfort. Replacing it takes little time and is a low-cost, high-impact solution.
2. Top up or replace old insulation in your attic. A poorly insulated attic is a primary source of energy loss. Also, over time, some types of insulation can settle and compact, allowing heat to escape through gaps. Experts recommend installing a dimensionally stable batt insulation like a Roxul product called Comfortbatt. Aim for an R-value of at least R50 or roughly a depth of 16 inches (41 cm).
3. Insulate basement headers and walls. Uninsulated basement headers are common, especially in older homes. They can act as a gateway for heated air to escape. Fixing the problem is fast and easy. Simply cut Comfortbatt stone wool insulation to fit the cavity and compress into place. Doing this throughout your basement will prevent heat loss and can potentially save hundreds of dollars each year.
4. Caulk around windows. Cracks and crevices are a source of heat loss. They can also be an entry point for water/moisture, as well as for unwelcome insects. Preventative maintenance, such as caulking, can improve energy efficiency and avoid costly repairs.
5. Change your furnace filter. Make it a point to check your furnace filter monthly, always changing it when it’s dirty. This will improve the performance and efficiency of your furnace, saving you money.
Source: www.newscanada.com
Tags: Caulk around windows, Change your furnace filter, eplace old insulation in your attic, Insulate basement headers and walls, Replace weather-stripping around doors, Replace weather-stripping around windows, top up insulation in your attic
Category:
Educational Purpose| No Comments »
July 27th, 2015

We provide commercial, residential and industrial electrical solutions to all types of electrical work. Some of our services include:
- service upgrades
- knob and tube removal
- ballast changes
- Home Reno’s
- Office Reno’s
- telephone cabling
- data cabling
- lighting solutions
- emergency repairs
- Service Maintance
Wurch Electric has been in business for only twenty two years, but our team of five has over a combined 35 years of experience as electricians in Winnipeg. We are well versed in all building and maintenance codes in Winnipeg and guarantee that your electrical work will meet all local codes and regulations.
 
If you’re planning for new construction or adding an addition,needing nob and tube replaced, make sure the electrical is done right the first time .
If you’re looking for a Quality Winnipeg electricians call Wurch Electric today for a free quote on your project !
Tags: ballast changes, data cabling, Don Wurch Electrician, emergency repairs, home and office renos, knob and tube removal, lighting solutions, Service Maintance, service upgrades, telephone cabling, Winnipeg Electrical Contractor, winnipeg electrician
Category:
Educational Purpose| No Comments »
July 27th, 2015
Lowe’s will add four new sites in British Columbia, two in Alberta, one in Saskatchewan and seven in Ontario. PHOTO: By Ildar Sagdejev, via Wikimedia Commons
TORONTO—Lowe’s Canada has announced in addition to completing the acquisition of 12 former Target sites, where it intends to open new stores, the company also plans to open two more locations in Ontario. Construction is currently underway in Ancaster and Mississauga, representing an additional investment in excess of $50 million.
“These 14 new locations are a tremendous win for us in Canada, accelerating our growth across the country and bringing our total store count to 54 locations,” Sylvain Prud’homme, president of Lowe’s Canada, said. “We continue to receive a positive reaction from our customers on our store experience and this helps us reach additional communities more quickly.”
The new Lowe’s store sites are located across Canada, many in markets where Lowe’s is currently underpenetrated, the company said. As a result of these new locations, approximately 2,000 jobs will be created in Canada, and Lowe’s total Canadian store count will increase to 54 locations including 37 stores in Ontario, 3 in Saskatchewan, 9 in Alberta and 5 in British Columbia.
Lowe’s acquisition of the 12 former Target locations has been completed, including the purchase of Target’s Milton, Ontario distribution centre for a total purchase price of approximately $147.75 million. This acquisition came as part of a real estate auction following Target’s decision to pull out of in Canada.
The company said the 14 new stores, located across the country will enhance Lowe’s presence in Western Canada and strengthen its base in Ontario. The company will add four new sites in British Columbia, two in Alberta, one in Saskatchewan and seven in Ontario.
Source: canadianmanufacturing.com
Lowe’s Coming to Winnipeg
Winnipeg is getting a Lowe’s.
The massive American based home improvement chain is planning to build a new location on Kenaston, north of Scurfield Boulevard.
According to Winnipeg Construction Association documents obtained by 680 CJOB, zoning for the site of the store is approved and construction could start later in 2015. The goal is to finish construction and open the doors by sometime in 2016.
The store would be 106,000 sq. ft and go near a Red River Co-Op gas bar along the Kenaston strip.
Lowe’s has over 1,800 stores in the US, including one in Grand Forks.
It began expanding to Canada in 2008 and recently bought some of the now vacant Target stores across the country but none in Winnipeg.
Tags: 1800 stores, Lowe’s Coming to Winnipeg, winnipeg, Winnipeg Construction Association
Category:
Educational Purpose| No Comments »
December 31st, 2014

Source for photo : Chrisd.ca
Amazing that New Years Eve 2014 is just hours from turning over to 2015 with a Happy New Years .
Wurch Electric would like to thank all his business partners for a great year. We would like to wish everyone a Wonderful New Years 2015.
May the New year bring forth Health and Happiness. We look forward to a exciting 2015 New Year
Happy New Years 2015 from Wurch Electric
Thank you for a great Photo from ChrisD.ca, Happy News Years
Tags: chrisd.ca, don wurch wishing business partners Happy New Years, happy new years 2015, health and happines for 2015, new years eve, wurch electric.
Category:
Educational Purpose| No Comments »
November 7th, 2014

Willies Fix-It Shop is have a Tune Up your Snow Blower Special
Our Hours Of Operation
10am to 2 pm
and
5 pm to 7 pm
Do not be left out in the Cold


Tags: 204.229.7030, changing oil, electric start, fuel filter, pull cord, Snow Blower, spark plug, tune up your snow blower, Willie Wiebe owner, willies fix it shop
Category:
Educational Purpose| No Comments »
October 23rd, 2014
Since the Challenge was put forward for Don and his Wife to take the ALS Ice Bucket Challenge. They decide to put forward the challenge to there friends also.
Enjoy the Video as this ALS Ice Bucket Challenge , remember to Donate
Tags: ALS, ALS Ice Bucket Challenge, Don Wurch ALS Ice Bucket Challenge, Donate to a great Cause, Ice, water
Category:
Educational Purpose| No Comments »
|
| |
|
|

